Originally published on Medium on December 10, 2024.
Hybrid Cloud Architecture Series with Snowflake Part 1
There are several ways to achieve a “Hybrid Cloud Architecture”, meaning to connect Snowflake to your on-premise or private Cloud resources and also the other way around.
You can use Snowflake External Access Privatelink or you can expose an identity aware reverse proxy like Oauth2-Proxy which Snowflake functions can access using a bearer token.
However, this post is particularly about how you can setup (hands-on) an SSH tunnel from Snowflake to your company’s DMZ (demilitarized zone) in order to let Snowflake access resources behind your firewall such as on-premise data lakes, databases, APIs, files or AI models etc.
These resources may also be in a VPC/VNET in a private Cloud network.
For those of you who can not wait to see the code, here is the Github to all the code including a Docker compose file to test locally:
Use cases:
This hybrid architecture can tremendously accelerate the value which you can get out of Snowflake during your transition to the Cloud by accessing resources from the Cloud that are not yet migrated. Hence you can use the benefits of Elastic Cloud Computing today even with legacy services.
Notably on the security front there are also huge benefits, since there are some APIs, AI models or data that will never move to the Cloud for compliance reasons. These services as well as on-premises data can now be accessed using Snowflake and this access can be cut anytime.
Reference Architecture:
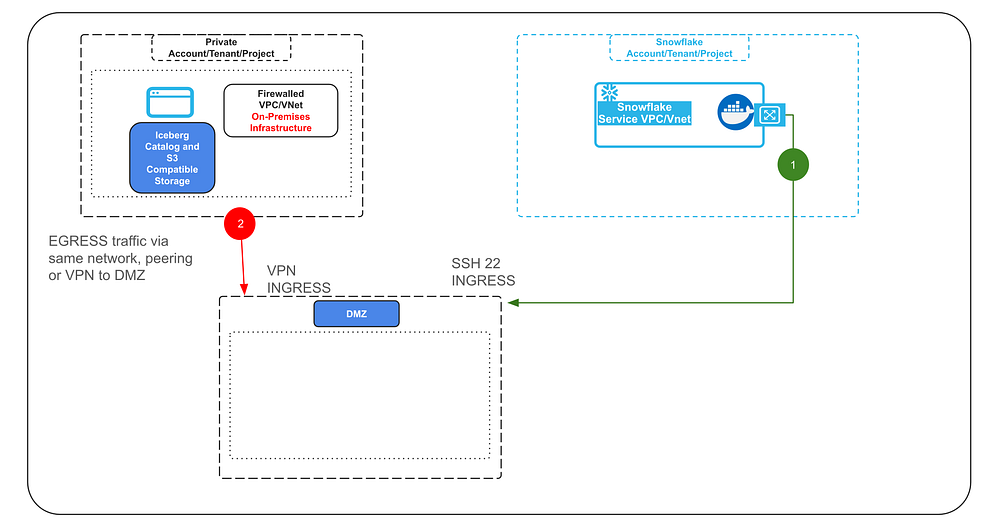
In essence the on-premise or private Cloud resources firewall will not open any ports, but merely create an outbound connection via VPN (or other type of TCP/SSH tunnels).
It may be connected to the DMZ via peering or just by being generally reachable in the same network (2).
On the DMZ the firewall will need to open an SSH port in order to be able to establish an SSH tunnel or several SSH tunnels with Snowflake (1).
The DMZ will act as a bridge between the on-premise or private Cloud network and the traffic connecting via the tunnel with Snowflake in order to keep all ingress ports on the firewall closed.
The SSH tunnel from Snowflake will be established in this demo using Snowflake Container Services (SPCS).
The container will use an SSH private key to establish the tunnel during start up.
A note on security:
In production, SSH private keys should be avoided and it is advisable to use short lived SSH certificates instead.
You can setup an automated process that spins the container up when needed, in order to retrieve a short lived SSH certificate from your backend and use Snowflake Snow-CLI to spin up the container and re-establish a tunnel using that certificate.
In the same manner, the way hard coded secrets are used in this demo in the notebooks and code, should not be done like this in production. I would advise to setup proper credential brokering. For example implement a Device Code OAuth Flow for the Jupyter notebooks to have users obtain OAuth tokens via SSO (Single Sign On) so that they can access the Iceberg Catalog.
Another recommendation is to use more Snowflake aligned open source Iceberg catalog such as Apache Polaris that implements role based access and policy based access controls similar to Snowflake.
You may also want to consider other flows which will let the container obtain secrets from a secret manager in the backend, especially for the Streamlit example.
Secrets in code must be avoided in production. The secrets provided via the environment variables (SSH key, user, host) will not be accessible from within the container by the way. They will only be accessible when the container spins up and establishes the connection, so that part is solved in the demo.
However, as can be concluded, this demo is intended as a proof of concept and shows the technical feasibility to access private resources behind a firewall using different query engines from Snowflake. It is not a full fledged production setup, it however provides the technical key elements needed to make such an architecture work. Hopefully saving you valuable time in the process and unlocking new use cases.
By the way, why are we using SSH and not OpenVPN or Wireguard etc.?
Those VPN services require the NET_ADMIN privilege for a container, which are not given in Snowflake Container Services today.
The Demo#
We will run a container in Snowflake that has two query engines (DuckDB + Spark) available to query an Iceberg Datalake with an Iceberg REST Catalog behind a firewall.
The query engines can be used in a provided Jupyter notebook or VSCode instance (both provided in the container), in a Streamlit application (also in the container) plus a REST API that can be called from within Snowflake as a UDF.
Let’s have a quick look at these video snippets for the things you can expect and what we will be building.
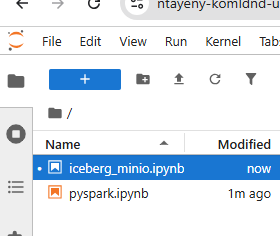
1. Query from Jupyter Notebooks via SSH Tunnel#
Query an Iceberg Datalake and Catalog which are both hosted on-premise behind a firewall from Snowflake using the PRIVATE IP addresses of the self hosted Iceberg REST Catalog and Iceberg S3 Minio Datalake storage within a Jupyter notebook hosted in Snowflake SPCS.
One notebook is using DuckDB (the first) and the second notebook is using Apache Spark as a query engine.
You can create additional dataframes querying Snowflake data and join this data with the on-premise data frames in the notebook.
Nice thing to note is, because we are using Spark or DuckDB as query engines in the container and not a Snowflake virtual warehouse there will be no result set cache in Snowflake from the on-premise data being queried. Once the tunnel connection is cut there is no more data access to the on-premise data from Snowflake or anything cached in Snowflake’s internal stages.
a) DuckDB query engine (with PyIceberg) to query the on-premise Iceberg data lake from Snowflake via SSH tunnel in a Jupyter notebook:
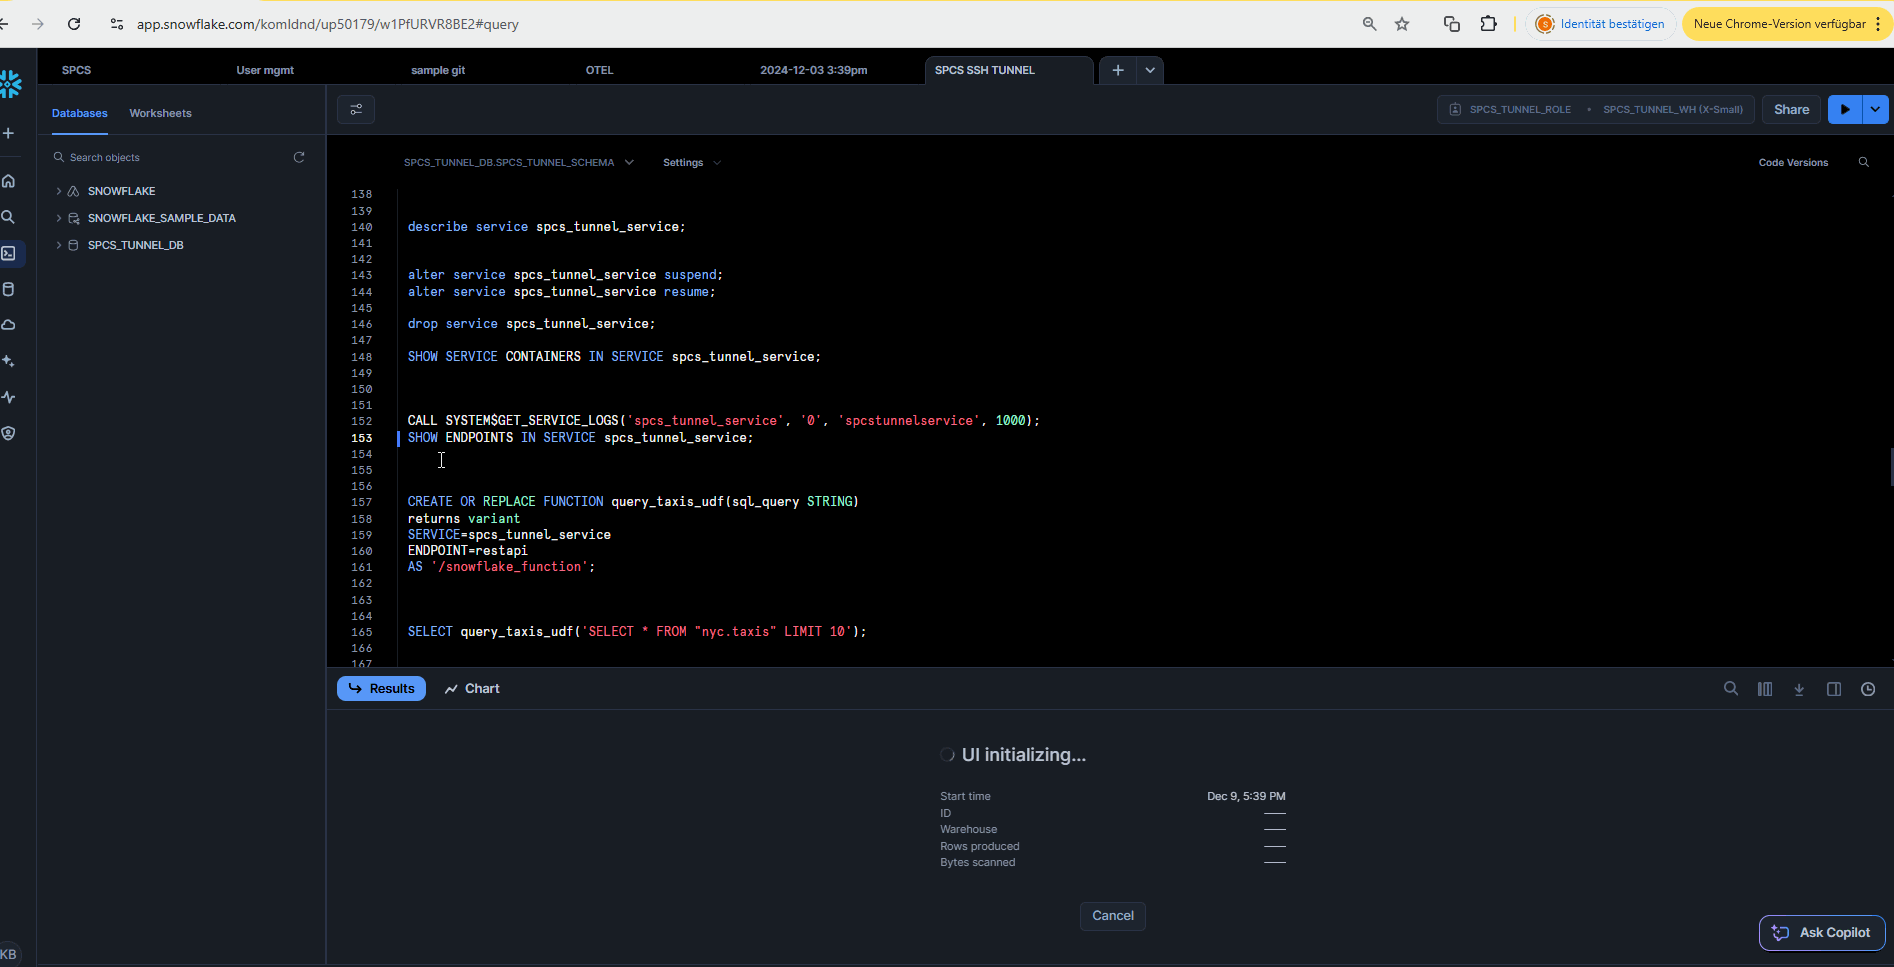
b) Apache Spark query engine to query the on-premise Iceberg data lake from Snowflake via SSH tunnel in a Jupyter notebook:
2. Query via Snowflake UDF#
You can create a Snowflake UDF that talks to a REST API in the container, which executes the query (using DuckDB) against the Iceberg on-premise data lake directly from within Snowflake (in the bounds of the private container network) and use the UDF to join data directly with Snowflake tables in a Snowflake workbook or notebook.
Note, that in this case, the results of the UDF will be cached in the Snowflake internal stage result set cache.
UDFs that call container functions do not support the ability to return tables, but only scalar results in Snowflake today. Meaning the resulting payload can not be bigger than 16MB and needs to be normalized / flattened into a table. I am sure that the Snowflake team will however address this limitation in the future.
You do not have any limitations joining data with Snowflake and on-premise data in the Jupyter notebook provided however.
3. Streamlit Application#
Embed the on-premises Iceberg query in a Streamlit Application in the container.
Here you can also see VSCode is also running in the Snowflake container for some spontaneous edits. You can also use VSCode notebooks and the VSCode Snowflake extension by the way.
Building the Demo#
So how can we set this up?
Before we setup anything in Snowflake itself, you will need an Iceberg S3 data lake and Iceberg REST Catalog with sample data.
For that you need to get yourself a Linux server that is accessible via SSH from the internet and that you can use to install the open source Iceberg REST Catalog and S3 Minio storage using Docker compose.
If you don’t have access to a Linux server you can play with you can get 2 free ones from Oracle Cloud.
While in this demo we will be hosting the Iceberg Catalog and data lake directly on the DMZ, with the ability to get 2 free servers you can also setup the reference architecture described earlier, but using one free Linux VM as the DMZ for the SSH tunnel and the other one to install the Iceberg data lake on.
Either way, once you have a Linux VM you will need to do at least 4 things:
- a) Create a non-root user
- b) Generate an SSH keypair for the user
- c) Install Docker, Docker compose and run the Iceberg data lake sample
- d) For the initial setup make sure you can reach ports 9000, 9001, 8888, 8889 temporarily via HTTP for the setup. (In Oracle Cloud you have to open those ports in the security group for your Linux servers.)
We will close down those ports later again.
You usually also have to open the ports with the Linux iptables firewall:
sudo iptables -I INPUT 2 -p tcp --dport 8888 -j ACCEPT
sudo iptables -I INPUT 2 -p tcp --dport 8889 -j ACCEPT
sudo iptables -I INPUT 2 -p tcp --dport 9001 -j ACCEPT
sudo iptables -I INPUT 2 -p tcp --dport 9000 -j ACCEPT
sudo iptables-save > /etc/iptables/rules.v4
While for points a) and b) I am sure you can find all the information you need on the internet, but to get the Iceberg data lake example to run for this demo you have to do the following:
Git clone from my adapted Duckberg (DuckDB to query Iceberg) Git repository fork:
git clone https://github.com/KellerKev/duckbergNow change directory into the following folder:
cd duckberg/duckberg/playgroundNow in the playground folder you can start:
docker compose up -dOnce everything is up and running go to this URL of your Linux VM and port to access the Jupyter notebook provided so that you can create and populate your Iceberg data lake with sample data:
http://x.x.x.x:8889/notebooks//000%20Init%20Iceberg%20data.ipynb
Where x.x.x.x is the IP address of your Linux VM.
You should see this notebook:
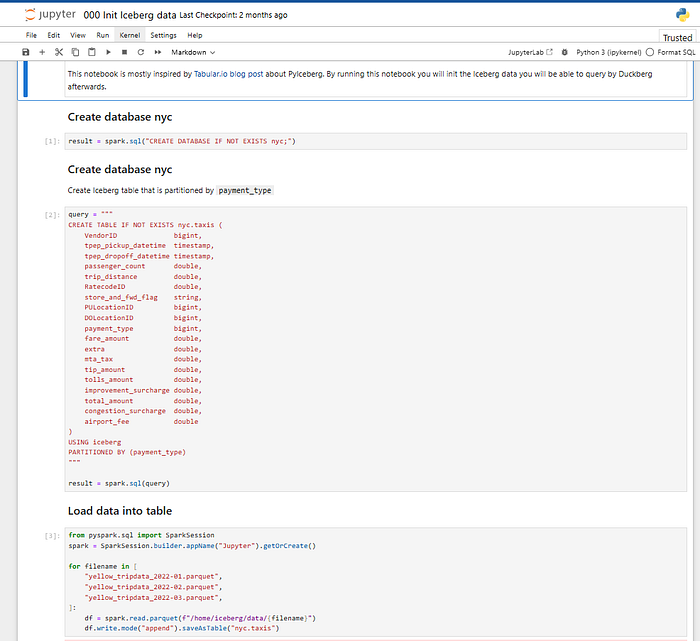
Now go ahead and execute every cell.
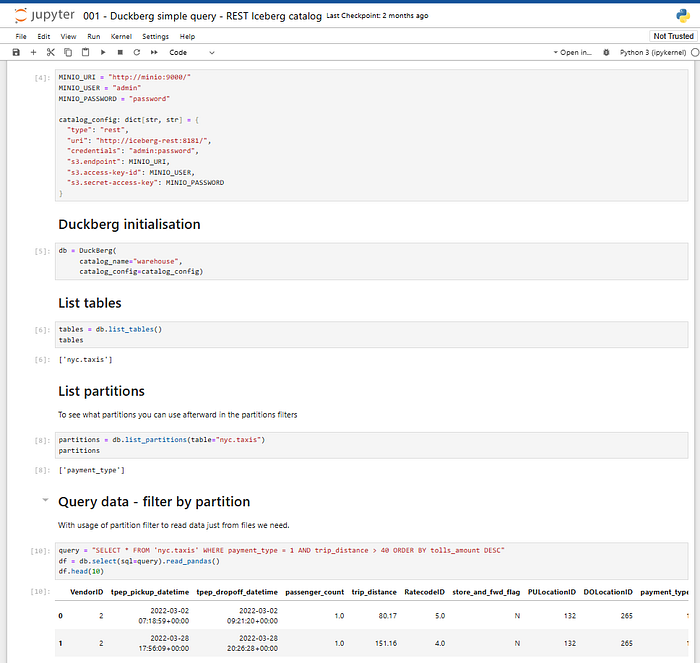
To test if everything is ok you can go to:
http://x.x.x.x:8888/notebooks/001%20-%20Duckberg%20simple%20query%20-%20REST%20Iceberg%20catalog.ipynb
And query your data lake with Duckberg locally:
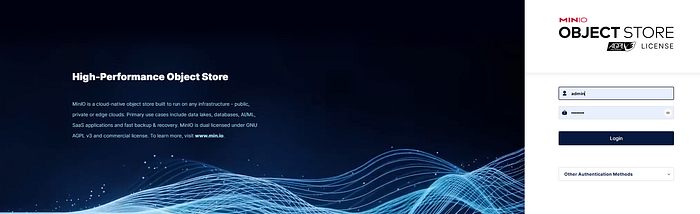
You will also be able to access the S3 Minio storage to see your parquet files and metadata files in the object storage at http://x.x.x.x:9001/:

Now that everything is up and running in your Linux VM you can close the ports 9000, 9001, 8888 and 8889.
You can do that in the security groups in Oracle Cloud (or AWS, Azure etc.) or your firewall and you can also close them down again with iptables:
sudo iptables -I INPUT 2 -p tcp --dport 8888 -j DROP
sudo iptables -I INPUT 2 -p tcp --dport 8889 -j DROP
sudo iptables -I INPUT 2 -p tcp --dport 9001 -j DROP
sudo iptables -I INPUT 2 -p tcp --dport 9000 -j DROP
sudo iptables-save > /etc/iptables/rules.v4
The only port reachable going forward should be port 22 for SSH.
Setting Up the Snowflake Container#
With this in place we can now setup the Snowflake container to create the SSH tunnel and query the data behind the firewall.
You will need the Docker image to run in Snowflake Container Services that I have prepared for the demo.
You can Git clone the Dockerfile to create the Docker image from my Git repository, or pull a readily prepared image from my Docker Hub to your server or workstation.
You will need to have Docker installed for this. I assume you are going for the Docker pull route as it is easier and quicker:
docker pull kbkeller/snowflakesshtunnel:latestNow setup a database, schema, warehouse and image repository in Snowflake in your Snowflake notebook:
(You can find the full SQL workbook here by the way)
use role accountadmin;

CREATE OR REPLACE WAREHOUSE spcs_tunnel_wh WITH WAREHOUSE_SIZE='X-SMALL';

create role spcs_tunnel_role;
grant usage on WAREHOUSE spcs_tunnel_wh to role spcs_tunnel_role;
grant operate on WAREHOUSE spcs_tunnel_wh to role spcs_tunnel_role;
grant create database on account to role spcs_tunnel_role;
grant role spcs_tunnel_role to user xxx;

use role spcs_tunnel_role;

create database spcs_tunnel_db;
create schema spcs_tunnel_schema;

-- temporarily grant all privileges on database
grant all privileges on database spcs_tunnel_db to role accountadmin;
grant all privileges on schema spcs_tunnel_schema to role accountadmin;

CREATE IMAGE REPOSITORY IF NOT EXISTS spcs_tunnel_images;

USE ROLE ACCOUNTADMIN;
alter user xxxx set mins_to_bypass_mfa=180;
SHOW IMAGE REPOSITORIES IN SCHEMA;
Then tag the image according to the naming convention of your Snowflake image repository:
docker tag kbkeller/snowflakesshtunnel xxxx.registry.snowflakecomputing.com/spcs_tunnel_db/spcs_tunnel_schema/spcs_tunnel_images/spcs_tunnel-image:latestMake sure to disable MFA for a bit before uploading:
alter user xxx set mins_to_bypass_mfa=180;Now login and push your image to your Snowflake repository:
docker login xxxx.registry.snowflakecomputing.com
docker push xxxx.registry.snowflakecomputing.com/spcs_tunnel_db/spcs_tunnel_schema/spcs_tunnel_images/spcs_tunnel-image:latest
Back in the Snowflake worksheet we can now setup the compute pool and prepare everything to create the service.
Note that you have to replace x.x.x.x with the IP address of your DMZ / data lake server.
USE ROLE ACCOUNTADMIN;

CREATE COMPUTE POOL IF NOT EXISTS SPCS_TUNNEL_COMPUTE_POOL
  MIN_NODES = 1 MAX_NODES = 1
  INSTANCE_FAMILY = CPU_X64_S
  AUTO_RESUME = true;

DESCRIBE COMPUTE POOL SPCS_TUNNEL_COMPUTE_POOL;

grant usage on compute pool SPCS_TUNNEL_COMPUTE_POOL to role spcs_tunnel_role;
grant operate on compute pool SPCS_TUNNEL_COMPUTE_POOL to role spcs_tunnel_role;
grant monitor on compute pool SPCS_TUNNEL_COMPUTE_POOL to role spcs_tunnel_role;
grant modify on compute pool SPCS_TUNNEL_COMPUTE_POOL to role spcs_tunnel_role;

GRANT BIND SERVICE ENDPOINT ON ACCOUNT TO ROLE spcs_tunnel_role;

use database spcs_tunnel_db;
use schema spcs_tunnel_schema;

CREATE NETWORK RULE allow_tunnel_rule
  TYPE = 'HOST_PORT'
  MODE= 'EGRESS'
  VALUE_LIST = ('x.x.x.x:22','0.0.0.0:443');

CREATE EXTERNAL ACCESS INTEGRATION allow_tunnel_eai
  ALLOWED_NETWORK_RULES=(allow_tunnel_rule)
  ENABLED=TRUE;

GRANT USAGE ON INTEGRATION allow_tunnel_eai TO ROLE spcs_tunnel_role;

use role spcs_tunnel_role;

revoke all privileges on database spcs_tunnel_db from role accountadmin;
revoke all privileges on schema spcs_tunnel_schema from role accountadmin;

DESCRIBE COMPUTE POOL SPCS_TUNNEL_COMPUTE_POOL;
Creating the Secrets#
The “encodedstring” secret is a Base64 encoded shell script that is executed when the container spins up. This is probably an unusual way to initialize the container, but it helps tremendously for testing as I can change the script easily and thereby changing the behaviour of the container.
Feel free to go to base64decode.org and decode the Base64 encoded script to see what it does. It’s mainly installing JupyterLab, Spark but also creating the SSH tunnel from an environment variable.
This is the part where the magic happens:
ssh-agent bash -c "ssh-add <(echo \"$DECODEDKEY\") && autossh -M $PORT1 -o StrictHostKeyChecking=no -o ServerAliveInterval=60 -o ExitOnForwardFailure=yes -gnNT -D 1080 -C -N $SSH_USER@$DMZ_IP" &Create the secrets in Snowflake:
CREATE or replace SECRET servicesecrets
  TYPE=generic_string
  SECRET_STRING='{
    "SSH_USER": "xxxx",
    "DMZ_IP": "x.x.x.x",
    "SSHKEYS": [
      { "key1": "LS0tLS1CRUdJTiBPU....." }
    ]
  }';
Replace SSH_USER with the username of your Linux user of your DMZ / Iceberg data lake server and DMZ_IP with the corresponding IP.
In order to pass the SSH key to the container we need to Base64 encode it. So take the private SSH key you created for the DMZ / Iceberg data lake server and head over to base64encode.org to encode it. Paste the Base64 encoded key as the value of the key1 JSON key.
Starting the Container#
Now that you have supplied the user, IP and SSH key in the “servicesecrets” Snowflake secret and we have the startup script ready, we can finally start the container in Snowflake and start playing.
Here is how you start the container now (replace the image path URL):
CREATE SERVICE spcs_tunnel_service
  IN COMPUTE POOL SPCS_TUNNEL_COMPUTE_POOL
  EXTERNAL_ACCESS_INTEGRATIONS = (allow_tunnel_eai)
  MIN_INSTANCES=1
  MAX_INSTANCES=1
  FROM SPECIFICATION $$
  spec:
    containers:
      - name: "spcstunnelservice"
        image: "xxx.xxxx.registry.snowflakecomputing.com/spcs_tunnel_db/spcs_tunnel_schema/spcs_tunnel_images/spcs_tunnel-image:latest"
        secrets:
          - snowflakeSecret: encodedstring
            envVarName: ENCODEDRUNSCRIPT
          - snowflakeSecret: servicesecrets
            envVarName: SERVICESECRETS
        env:
          SSHKEY: "False"
          ENVNAME: "snowtunnel"
          VSVERSION: "1.95.2"
    endpoints:
      - name: jupyter
        port: 3000
        public: true
      - name: vscode
        port: 3001
        public: true
      - name: streamlit
        port: 3002
        public: true
      - name: restapi
        port: 3003
  $$;
This will spin up the service, install everything and build the tunnel to your DMZ.
You can follow the process with the following SQLs:
describe service spcs_tunnel_service;
-- alter service spcs_tunnel_service suspend;
-- alter service spcs_tunnel_service resume;
-- drop service spcs_tunnel_service;
SHOW SERVICE CONTAINERS IN SERVICE spcs_tunnel_service;
CALL SYSTEM$GET_SERVICE_LOGS('spcs_tunnel_service', '0', 'spcstunnelservice', 1000);
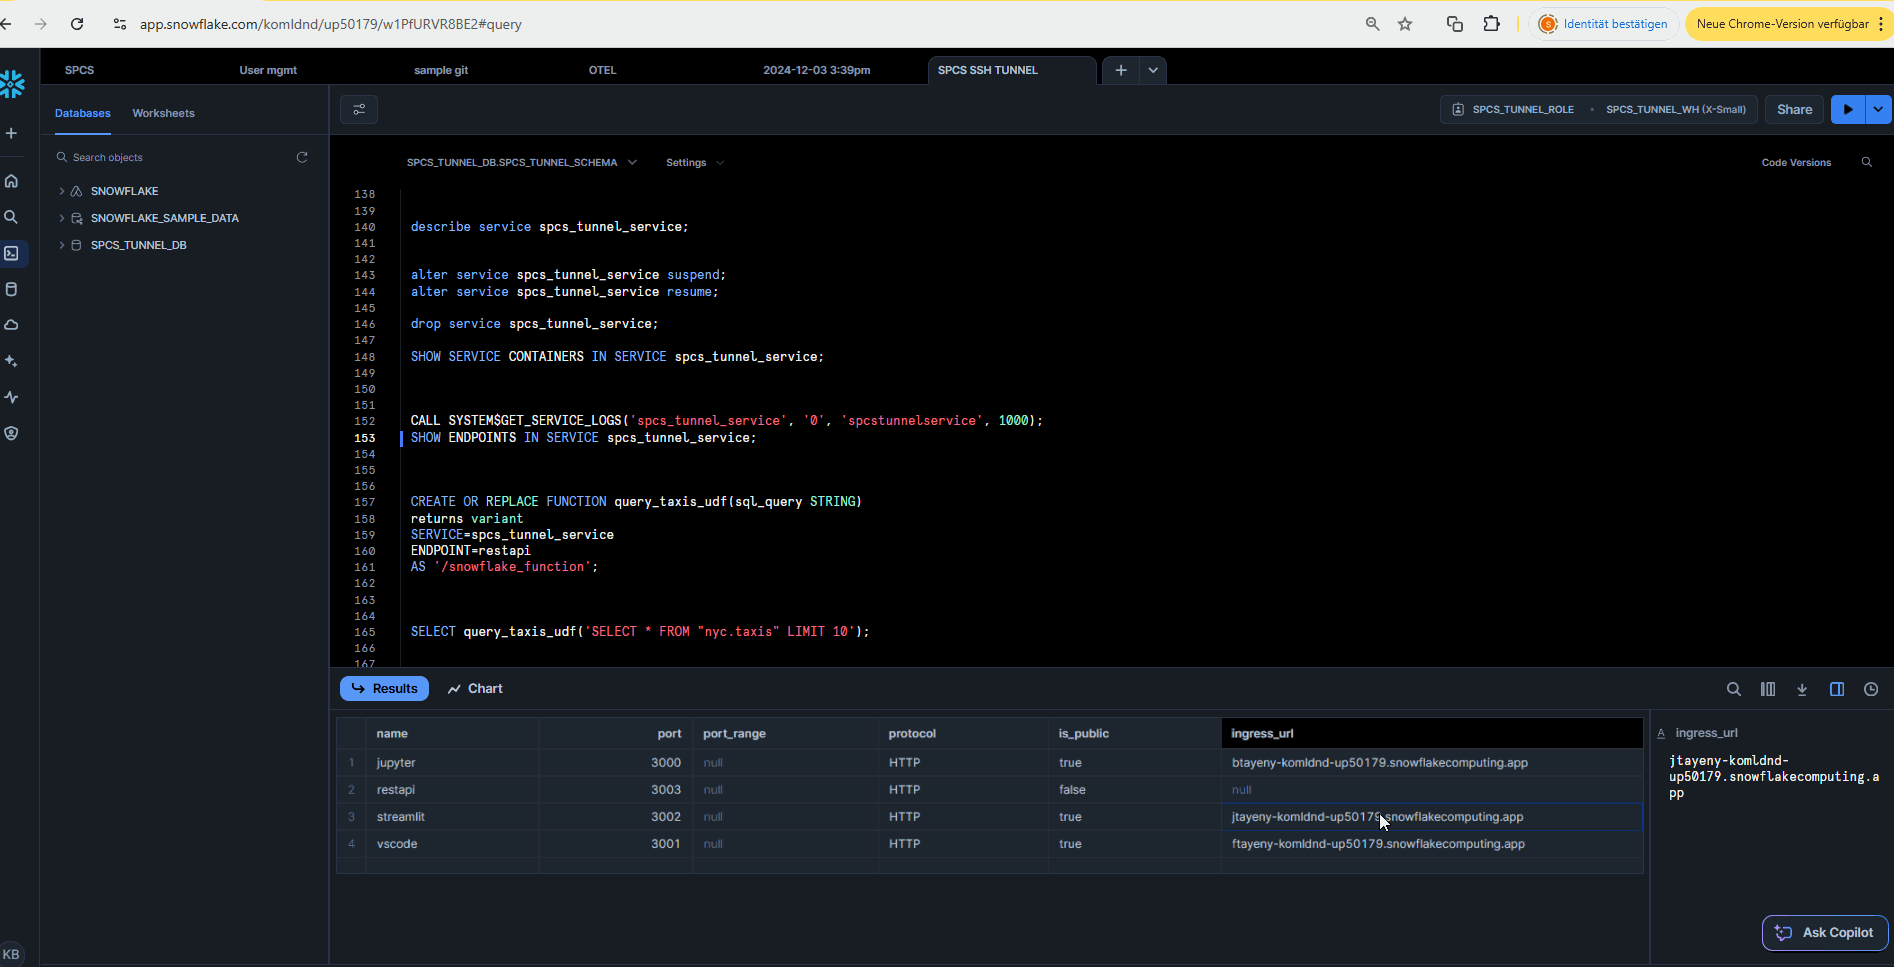
SHOW ENDPOINTS IN SERVICE spcs_tunnel_service;Most importantly the “SHOW ENDPOINTS” command which will show you the endpoints for the Jupyter notebook, Streamlit app and VSCode web instance.

Querying the Data#
You should now be able to easily access the Jupyter notebooks to query the data via the tunnel with DuckDB or Apache Spark.
NOTE: You will have to change the private IP address to match the one of your DMZ / Iceberg Data Lake server!
Querying via Snowflake UDF#
If you want to query the data through the tunnel via Snowflake UDF, here is how you can setup the UDF:
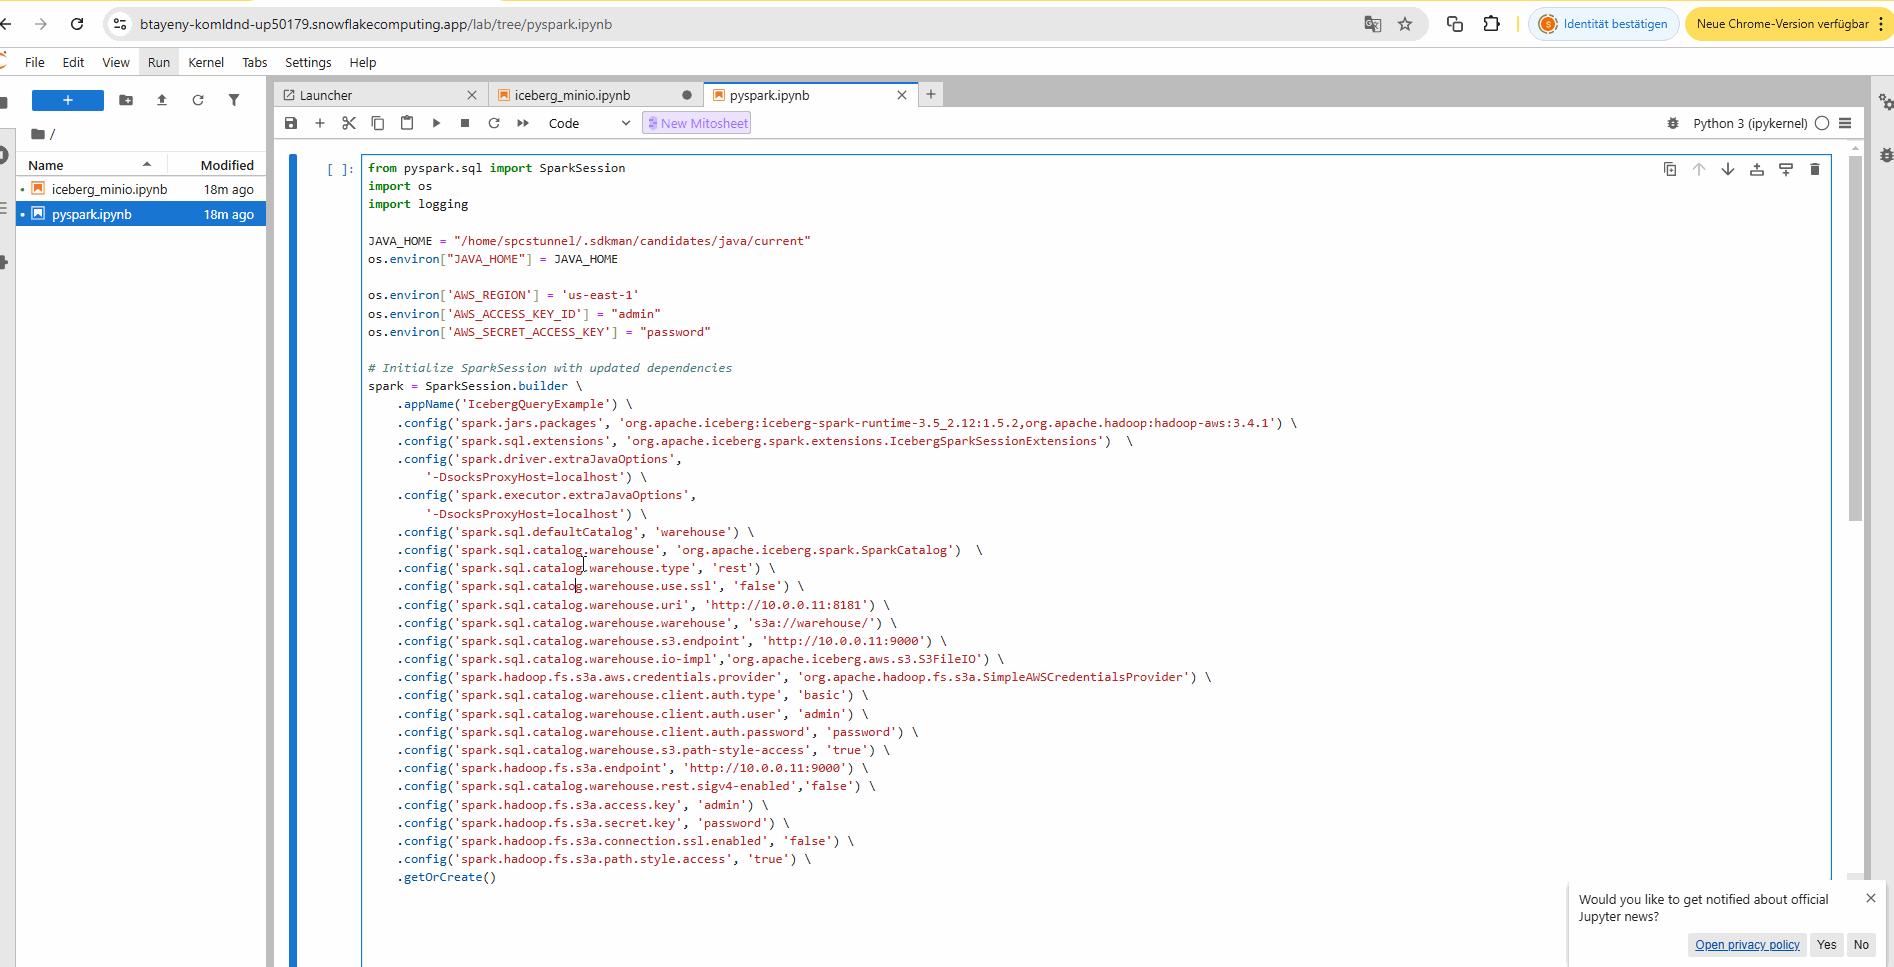
CREATE OR REPLACE FUNCTION query_taxis_udf(sql_query STRING)
  returns variant
  SERVICE=spcs_tunnel_service
  ENDPOINT=restapi
  AS '/snowflake_function';
Now you can test it:
SELECT query_taxis_udf('SELECT * FROM "nyc.taxis" LIMIT 10');
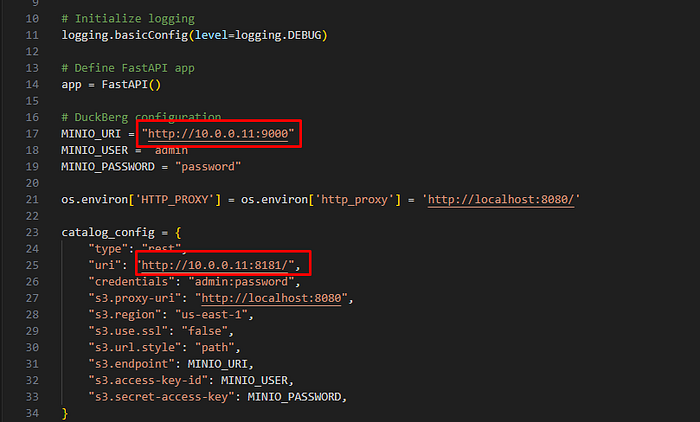
If the UDF does not work you have to change the private IP address to match the one of your DMZ / Iceberg Data Lake server in the REST API code. You can use the VSCode provided in the container to quickly adapt the REST API code or update the container image.
Update these IPs:
Flattening the UDF Results#
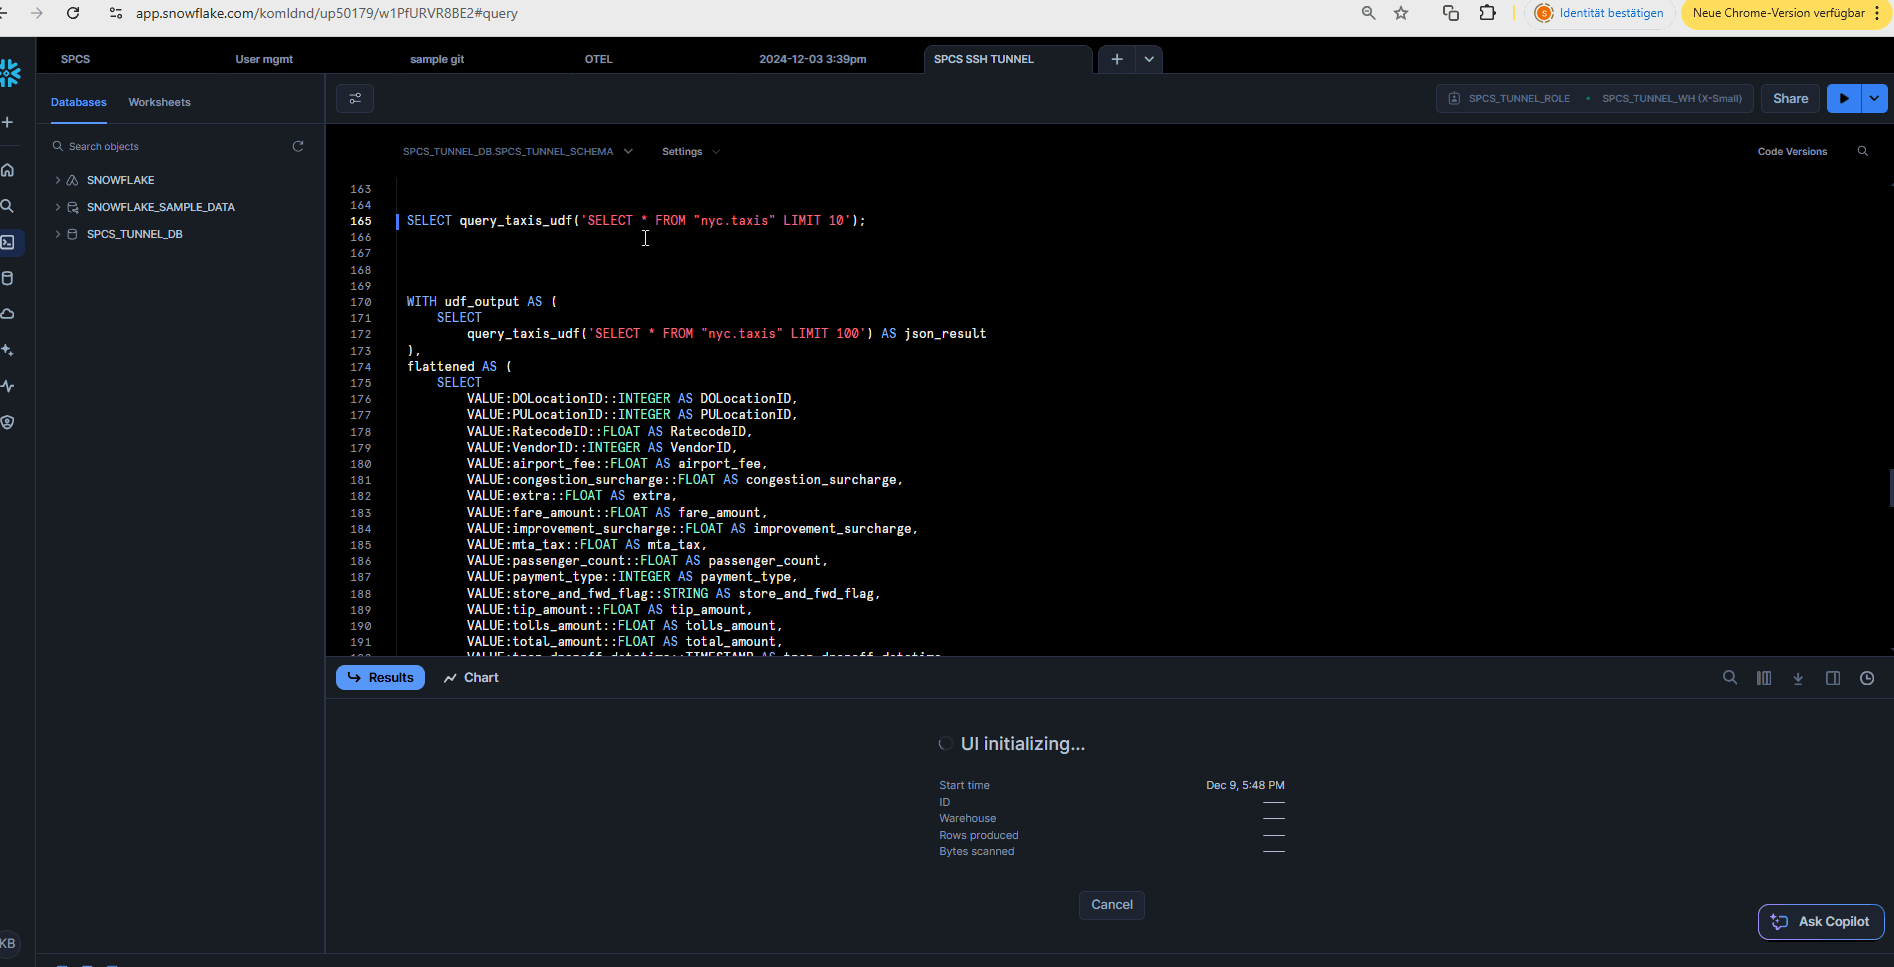
If all is working let’s transform the UDF scalar results, which look a bit hard to read, into a flattened table:
WITH udf_output AS (
  SELECT query_taxis_udf('SELECT * FROM "nyc.taxis" LIMIT 100') AS json_result
),
flattened AS (
  SELECT
    VALUE:DOLocationID::INTEGER AS DOLocationID,
    VALUE:PULocationID::INTEGER AS PULocationID,
    VALUE:RatecodeID::FLOAT AS RatecodeID,
    VALUE:VendorID::INTEGER AS VendorID,
    VALUE:airport_fee::FLOAT AS airport_fee,
    VALUE:congestion_surcharge::FLOAT AS congestion_surcharge,
    VALUE:extra::FLOAT AS extra,
    VALUE:fare_amount::FLOAT AS fare_amount,
    VALUE:improvement_surcharge::FLOAT AS improvement_surcharge,
    VALUE:mta_tax::FLOAT AS mta_tax,
    VALUE:passenger_count::FLOAT AS passenger_count,
    VALUE:payment_type::INTEGER AS payment_type,
    VALUE:store_and_fwd_flag::STRING AS store_and_fwd_flag,
    VALUE:tip_amount::FLOAT AS tip_amount,
    VALUE:tolls_amount::FLOAT AS tolls_amount,
    VALUE:total_amount::FLOAT AS total_amount,
    VALUE:tpep_dropoff_datetime::TIMESTAMP AS tpep_dropoff_datetime,
    VALUE:tpep_pickup_datetime::TIMESTAMP AS tpep_pickup_datetime,
    VALUE:trip_distance::FLOAT AS trip_distance
  FROM udf_output, LATERAL FLATTEN(INPUT => json_result)
)
SELECT * FROM flattened;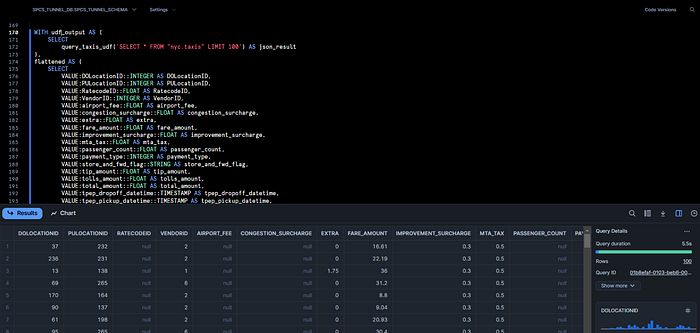
You can further simplify this by creating a view or a stored procedure such as this:
CREATE OR REPLACE PROCEDURE flatten_query_taxis_sp(
  p_col_list VARCHAR,
  p_table_name VARCHAR,
  p_row_limit NUMBER
)
RETURNS TABLE (
  DOLocationID NUMBER,
  PULocationID NUMBER,
  RatecodeID NUMBER,
  VendorID NUMBER,
  airport_fee NUMBER,
  congestion_surcharge NUMBER,
  extra NUMBER,
  fare_amount NUMBER,
  improvement_surcharge NUMBER,
  mta_tax NUMBER,
  passenger_count NUMBER,
  payment_type NUMBER,
  store_and_fwd_flag VARCHAR,
  tip_amount NUMBER,
  tolls_amount NUMBER,
  total_amount NUMBER,
  tpep_dropoff_datetime TIMESTAMP_NTZ,
  tpep_pickup_datetime TIMESTAMP_NTZ,
  trip_distance NUMBER
)
LANGUAGE SQL
AS
$$
DECLARE
  result_sql STRING;
  result_set RESULTSET;
BEGIN
  result_sql := 'WITH udf_output AS (
    SELECT query_taxis_udf(''SELECT ' || p_col_list || ' FROM "' || p_table_name || '" LIMIT ' || p_row_limit || ''') AS json_result
  ),
  flattened AS (
    SELECT
      VALUE:DOLocationID::NUMBER,
      VALUE:PULocationID::NUMBER,
      VALUE:RatecodeID::NUMBER,
      VALUE:VendorID::NUMBER,
      VALUE:airport_fee::NUMBER,
      VALUE:congestion_surcharge::NUMBER,
      VALUE:extra::NUMBER,
      VALUE:fare_amount::NUMBER,
      VALUE:improvement_surcharge::NUMBER,
      VALUE:mta_tax::NUMBER,
      VALUE:passenger_count::NUMBER,
      VALUE:payment_type::NUMBER,
      VALUE:store_and_fwd_flag::VARCHAR,
      VALUE:tip_amount::NUMBER,
      VALUE:tolls_amount::NUMBER,
      VALUE:total_amount::NUMBER,
      VALUE:tpep_dropoff_datetime::TIMESTAMP_NTZ,
      VALUE:tpep_pickup_datetime::TIMESTAMP_NTZ,
      VALUE:trip_distance::NUMBER
    FROM udf_output, LATERAL FLATTEN(INPUT => json_result)
  )
  SELECT * FROM flattened';

  result_set := (EXECUTE IMMEDIATE :result_sql);
  RETURN TABLE(result_set);
END;
$$;
And now you can execute the flattening query much simpler:
SELECT *
FROM TABLE(
  flatten_query_taxis_sp(
    'DOLocationID, PULocationID, fare_amount, trip_distance',
    'nyc.taxis',
    10
  )
);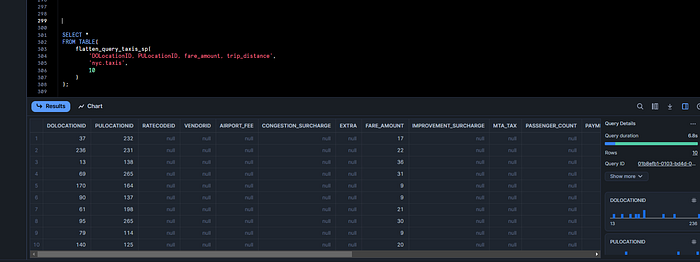
The null values are hard to remove as the schema has to be defined up front for flattening. Once Snowflake Container Services UDFs support table return types this inconvenience should be solved by itself.
Streamlit App#
Finally you can also check out the Streamlit app that you can use to query your on-premise data and make it available via Streamlit.
Head over to the Streamlit URL endpoint from the Container Services and check it out:

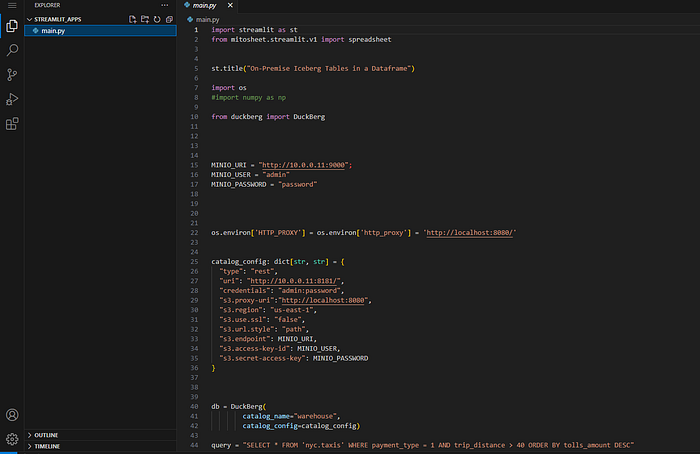
If it does not work, you can change the Streamlit app code on the fly using the provided VSCode instance to edit code.
You probably just need to adapt the private IP address to your DMZ / Private Iceberg Data Lake server. Paste the VSCode endpoint URL in your browser to access it and then open the Streamlit app:
And check out and play with the code and adapt the IP addresses if necessary as we did with the UDF REST API previously.
You can also open a terminal and see what else is in the container. There are some more Spark command line sample scripts and Jupyter notebooks.
Conclusion and Further Steps#
I have picked an Iceberg data lake as an example, but nobody can stop you from using this to access other resources like on-premise databases, APIs, AI models… you name it.
I can even see that it should be possible to directly connect to a z/OS mainframe 3270 terminal and execute automated commands using this library: https://github.com/IBM/tnz
Although z/OS and other usual on-premise resources have plenty of options to create REST or other APIs on top of them these days.
In part 2 of this post we will explore how we can reverse the process and expose services running in Snowflake Container Services to apps running outside of Snowflake directly.
That opens the door to do things like SFTP, FTP uploads to Snowflake or access an S3 Minio API directly in Snowflake.
If you reverse the process you can also expose Streamlit apps and other web apps to non-Snowflake users.
